
To get started on the journey towards becoming proficient at working with the very popular Docker and the container orchestrator Kubernetes for building business app solutions, hosting Splunk servers, machine learning containers, and even applications in robotics research, I’m outlining the essence of a Docker Desktop installation and configuration.
1. Install Windows Subsystem for Linux (WSL)
Running Docker (and Kubernetes) on a Windows 10 PC requires installation of the Windows Subsystem for Linux (WSL), as Docker only runs on Linux – I followed the manual installation steps 1-5, which installs WSL 1 and provides the option of upgrading to WSL 2 (preferred):
https://docs.microsoft.com/en-us/windows/wsl/install-win10#manual-installation-steps
For Step 6, I opened the Windows Store and chose Ubuntu 20.04 LTS as the Linux distribution:
https://www.microsoft.com/en-us/p/ubuntu-2004-lts/9n6svws3rx71?rtc=1&activetab=pivot:overviewtab
When the installation completed, I found the Ubuntu icon in the Windows Start screen, right-clicked and pinned it to Start and More > pinned it to the task bar.
Upon clicking the icon in the task bar the first time you will be prompted to enter a Unix username and password – instructions for doing this (and resetting the password / forgot password down the road) are here:
https://docs.microsoft.com/en-us/windows/wsl/user-support
Note that you don’t have to use your Windows user ID and password.
Type exit to exit the Ubuntu session.
After all setup is complete, clicking the Ubuntu icon in the task bar on subsequent starts gives this once-a-day startup message (which can be disabled – I left it for my login but disabled it for root):

Some useful commands include:
jimb@DESKTOP-6N4UAR1:~$ sudo -i (use your user login password)
root@DESKTOP-6N4UAR1:~# touch /root/.hushlogin
root@DESKTOP-6N4UAR1:~# lsb_release -a
No LSB modules are available.
Distributor ID: Ubuntu
Description: Ubuntu 20.04.2 LTS
Release: 20.04
Codename: focal
root@DESKTOP-6N4UAR1:~# cat /etc/os-release (another way of displaying version)
root@DESKTOP-6N4UAR1:~# apt update (gets list of updateable packages)
root@DESKTOP-6N4UAR1:~# apt upgrade (actually updates the packages)
The Windows C:\ drive is mounted at /mnt/c – you can get to your Windows files from the Ubuntu terminal from that location:
root@DESKTOP-6N4UAR1:~# cd /mnt/c
root@DESKTOP-6N4UAR1:/mnt/c# ll

Instructions are also provided to install Windows Terminal, which enables multiple tabs (quickly switch between multiple Linux command lines, Windows Command Prompt, PowerShell, Azure CLI, etc), create custom key bindings (shortcut keys for opening or closing tabs, copy+paste, etc.), use the search feature, and custom themes (color schemes, font styles and sizes, background image/blur/transparency). I chose not to do this installation at this time; perhaps I’ll do and cover that in another blog post.
If you are interested in installing Windows Terminal, the instructions are here:
https://docs.microsoft.com/en-us/windows/terminal/get-started
2. Install Docker Desktop
Docker Desktop is an application for your Mac or Windows environment that enables you to build and share containerized applications and microservices. Docker Desktop includes Docker Engine, Docker CLI client, Docker Compose, Notary, Kubernetes, and Credential Helper. This pretty much includes all the tools you’ll want or need for working with Docker, in one easy installation.
The Docker Desktop overview is here:
https://docs.docker.com/desktop/
Installation for a Mac is here:
Install Docker Desktop on Mac
Installation for Windows is here:
Install Docker Desktop on Windows
Click the ‘Download from Docker Hub’ icon which is this link:
https://hub.docker.com/editions/community/docker-ce-desktop-windows/
This takes you to the download page – click the ‘Get Docker’ icon which is this link:
https://desktop.docker.com/win/stable/Docker%20Desktop%20Installer.exe
When the installation completed, I again found the Docker Desktop icon in the Windows Start screen, right-clicked and pinned it to Start, and then clicked More > and pinned it to the task bar. Note that Docker Desktop doesn’t automatically start after installation; you have to click the icon to start it. Once it has been started, it continues to run even if you close the form.
Clicking the Docker Desktop icon launches the onboarding tutorial. The tutorial includes a simple exercise to build an example Docker image, run it as a container, push and save the image to Docker Hub. The image below reflects having run the ‘getting-started’ docker app by opening a WSL CMD window and executing ‘docker run -d -p 80:80 docker/getting-started’:

The image below reflects the Docker Desktop form after running the ‘getting-started’ docker app:

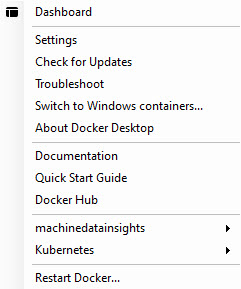
You can find the Docker Desktop icon in the ‘hidden icons’ section of the task bar (click the /\ icon to the right), and right-click that icon for a menu of selections:
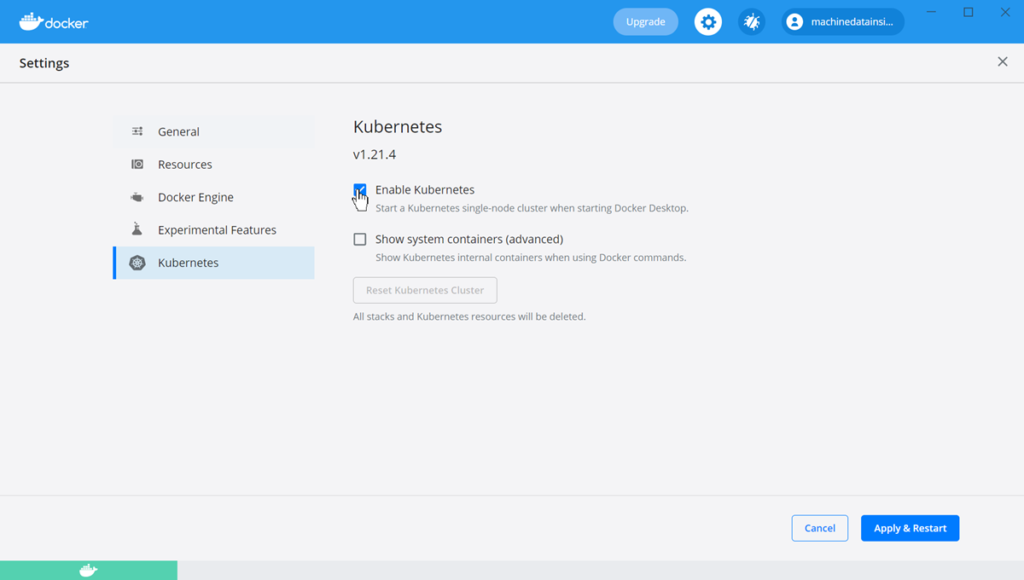
3. Enabling Kubernetes
If you’re working with Docker, you’ll most likely be working with Kubernetes as well, eventually if not immediately. You can enable a Kubernetes environment from Docker Desktop by clicking the ‘gear’ icon in the top menu, clicking the Kubernetes option on the left, click ‘Enable Kubernetes’, and finally click ‘Apply & Restart’:
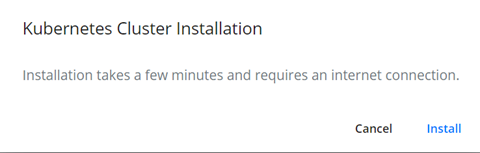
You will then see a prompt to install Kubernetes – click Install:
Wrapup
This concludes the basic Docker Desktop installation and enabling of the Kubernetes environment. At this point it would seem fitting to launch into an overview of how to write apps for Docker and run containers in Kubernetes, but these subjects are more palatable if you’re building something of interest that happens to use these technologies – so we’ll take that approach in other articles.
In the meantime, you can whet your appetite with this image and a link to a Docker overview.
